Saturday, May 25, 2019
Facade lighting scheme
Dear Reader,
This is one of my façade lighting project. The building is an IT office with edgy design thus the feature can be highlighted by simply highlighting the edges.
Waiting for the project to be get completed. Will share the pics when its completed :) .
Sunday, January 27, 2019
What is Color Rendering Index (CRI)?
Color Rendering Index (CRI)
Lets break it down first
Color : We all know what that 'color' means.
Rendering : "process (an outline image) using colour and shading in order to make it appear solid and three-dimensional" - Google definition.
Index : "a sign or measure of something" - Google definition.
In lighting linguistics, CRI translates as the ability of the light source to bring out the colours of the object when the light falls on it. This parameter is measured in reference to rendering of the colors under the effect of the natural lights or under the sunlight.
Interpretation of CRI values:
CRI 90 - The colors will be as good as 90% when placed under sunlight. - (good)
CRI 85 - The colors will be as good as 85% when placed under sunlight. - (average)
CRI 70 - The colors will be as good as 70% when placed under sunlight. - (poor)
The higher the CRI, the better.
CRI is a crucial when it comes to indoor lighting. It really enhances the overall appearance of area or that particular painting which you want to stand out or that expensive carpet on the floor or that table meant for banquets.
An easy experiment to understand the difference:
Just open the palm of your hand on a broad daylight and pay attention to the blood vessels and the veins. Repeat the same under artificial light of CRI 90 then gradually down to CRI 70. One can see how these minute colors of blood vessel and veins become less & less prominent to the point one really has to look t it with more attention to see the difference.
So if there is an expensive painting say for example 'Mona Lisa' , with lots of different shades of all the colors known to "man" kind, will certainly look flat and bland. The missing colour details would strip the artwork of its magic and charm.
Therefore higher the CRI the better. Select the lamps with higher CRI for important indoor area or for a particular task of highlighting / focussing.
Sunday, December 30, 2018
Back lighting - Coves
Dear Reader,
In this blog we talk about the placement/positioning of the of the light source. Its important to conduct a mock up. Mock up is like a rehearsal before one takes up full scale installation. Its important to note the following:
1) Depth of the niche / cavity - this gives the idea on how to place the light source and the angle.
2) Texture or the type of surfaces - to know how likely one can see the hotspots / dots on the surface.
Below picture shows the positioning of the profiles / channels on which the led strips (in this case) is to be angled for the best results. However its important to note depending on the surface and the visual impact the decision has to be taken. Sometimes the brightness is the concern, the distance to which the light travels and sometimes just a faint glow is the intent. It all depends on how the finished project is going to look like.

Its always important to make sure that the surface is smooth so that the undulations of the surface do not impact the appearance of the finished project. In my next blog I'll try to explain the how to obtain the best results from the flexible strip lights.
Saturday, December 29, 2018

Monday, November 12, 2018
Classification of Luminaires
Dear Reader,
Todays post is about classification of indoor luminaires. I've tried my best to get them sorted and that's just part 1 of 3 because we have outdoor luminaires and hazardous luminaires are a different breed. So for now let settle with indoors.

Sunday, November 11, 2018
Back lighting
Dear Reader,
Todays topic is about back lighting through perforated sheets. I would be using images from google, which best describe the intended techniques.There are several ways to back light a panel but some of the methods commonly chosen for a residential, hotel or indoor applications, are as follows:
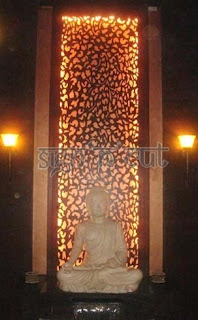 Lets focus on the perforated sheet, probably made of metal sheet or an MDF. Notice the bright inner edges. Its because the light source has been installed on the inner side of the assembly and placed on the perimeter. Such arrangements are often customised according to the design or available spaces. So the technique may also vary.
In this case a flexible-cuttable-linear lighting fixture has been chosen, in other words LED Strips (<--google it). These strips are mounted via aluminum, channel flat or in angular shape. Angular shape is preferred but in some cases the light source gets visible which causes glare and kills the effect, so choose carefully.
The other methods could have been:
1) LED modules (google it): which offer wider range output and controls.
2) Linear rigid lighting: for higher outputs, They resemble batten lights.
3) RGB version of LED Strips.
 This is a case of backlighting on the ceiling. Yes of course LED Strips can be used here. One should really consider a Panel LED Modules(google). These can be considered for ceiling, wall and even floor mount applications. They are basically best known for their uniformity of light effect and the drama that they create. You will need an expert hands for the job here as they are a delicate piece of light source.
2) Can go for RGB version. Pay attention to the application and purpose for which the area will be used.
3) LED strips should be installed on aluminum channels which makes the installation and lighitng effect to be in a straight line. It also helps in dissipating the heat from the led strips.
4) Special heat absorbing adhesive can be used for higher wattage led strips.
5) NO DOTS. Yes, dots should not be visible. Its a sudden death. Try to use diffusers or aim / place the source away from the visual field.
6) Don't go crazy with brightness. Brightness is not the answer, if the effect fails to improve the look and feel of the area then its all waste of money and time.
References of pictures used in this blog:
1)
https://www.google.com/url?sa=i&rct=j&q=&esrc=s&source=images&cd=&cad=rja&uact=8&ved=2ahUKEwi2nPnRw8zeAhUN3Y8KHQFiBvQQjRx6BAgBEAU&url=https%3A%2F%2Fwww.indiamart.com%2Fproddetail%2Fdecorative-jali-4157134897.html&psig=AOvVaw3H7vtBSHhMFf8PZy0VZFLk&ust=1542031488199094
2)
https://i0.wp.com/img03.olx.in/images_olxin/302842995_1_1000x700_down-ceiling-designing-with-lighting-mdf-cutting-amritsar.jpg?resize=480%2C360&ssl=1
Todays topic is about back lighting through perforated sheets. I would be using images from google, which best describe the intended techniques.There are several ways to back light a panel but some of the methods commonly chosen for a residential, hotel or indoor applications, are as follows:
Case 1
 Lets focus on the perforated sheet, probably made of metal sheet or an MDF. Notice the bright inner edges. Its because the light source has been installed on the inner side of the assembly and placed on the perimeter. Such arrangements are often customised according to the design or available spaces. So the technique may also vary.
In this case a flexible-cuttable-linear lighting fixture has been chosen, in other words LED Strips (<--google it). These strips are mounted via aluminum, channel flat or in angular shape. Angular shape is preferred but in some cases the light source gets visible which causes glare and kills the effect, so choose carefully.
The other methods could have been:
1) LED modules (google it): which offer wider range output and controls.
2) Linear rigid lighting: for higher outputs, They resemble batten lights.
3) RGB version of LED Strips.
Case 2

Case 3
For outdoor application always use an IP protected lighting products (IP54 onwards). If the enclosure is housing the light source is an IP protected one then indoor products can also be installed, i.e. IP20 rated lighting products. Conditions of using an IP 20 lighting products for an outdoor application will be discussed separately. Please read about the IP ratings or Ingress protection ratings on wiki or google.Do's and Don't
1) Light source should and always be invisible from the general visual field.2) Can go for RGB version. Pay attention to the application and purpose for which the area will be used.
3) LED strips should be installed on aluminum channels which makes the installation and lighitng effect to be in a straight line. It also helps in dissipating the heat from the led strips.
4) Special heat absorbing adhesive can be used for higher wattage led strips.
5) NO DOTS. Yes, dots should not be visible. Its a sudden death. Try to use diffusers or aim / place the source away from the visual field.
6) Don't go crazy with brightness. Brightness is not the answer, if the effect fails to improve the look and feel of the area then its all waste of money and time.
References of pictures used in this blog:
1)
https://www.google.com/url?sa=i&rct=j&q=&esrc=s&source=images&cd=&cad=rja&uact=8&ved=2ahUKEwi2nPnRw8zeAhUN3Y8KHQFiBvQQjRx6BAgBEAU&url=https%3A%2F%2Fwww.indiamart.com%2Fproddetail%2Fdecorative-jali-4157134897.html&psig=AOvVaw3H7vtBSHhMFf8PZy0VZFLk&ust=1542031488199094
2)
https://i0.wp.com/img03.olx.in/images_olxin/302842995_1_1000x700_down-ceiling-designing-with-lighting-mdf-cutting-amritsar.jpg?resize=480%2C360&ssl=1
Sunday, September 9, 2018
Glossary - Z
Z
zonal-cavity
inter reflectance method a procedure for calculating
coefficients of utilization, wall exitance coefficients, and ceiling cavity
exitance coefficients, taking into consideration the luminaire intensity
distribution, room size and shape (cavity ratio concepts), and room
reflectances. It is based on flux transfer theory.
zonal
constant a factor by which the mean intensity emitted by a source
of light in a given angular zone is multiplied to obtain the lumens in the
zone. See Chapter 2, Measurement of Light and Other Radiant Energy.
zonal
factor interreflection method a procedure used for calculating
coefficients of utilization, based on integral equations, that takes into
consideration the ultimate disposition of luminous flux from every 10° zone
from luminaires.
zonal
factor method a procedure for predetermining, from typical
luminaire photometric data in discrete angular zones, the proportion of
luminaire output that would be incident initially (without interreflections) on
the workplane, ceiling, walls, and floor of a room.
zonal
multipliers multipliers for the flux in each 10-degree
conical zone from 0° (nadir) to 90° (horizontal) from a luminaire, expressing
the fraction of that zonal flux that is directly incident on the floor of a
room cavity. These multipliers are a function of the room cavity ratio and are
used to determine the direct ratio.
Subscribe to:
Posts (Atom)